Difference between revisions of "Glaciersteel Quest"
(Created page with "== Requirements == * Access to Winterhold continent * Level 1200 == Rewards == * ?x Jewels * Random Sets#Glaciersteel_Set_.28Level_1200.29|Glaci...") |
|||
| (2 intermediate revisions by the same user not shown) | |||
| Line 4: | Line 4: | ||
== Rewards == | == Rewards == | ||
| − | * | + | * 135x Jewels |
* Random [[Sets#Glaciersteel_Set_.28Level_1200.29|Glaciersteel Set]] piece | * Random [[Sets#Glaciersteel_Set_.28Level_1200.29|Glaciersteel Set]] piece | ||
* Access to [[Continental Progression|Mid Winterhold]] Continent | * Access to [[Continental Progression|Mid Winterhold]] Continent | ||
| Line 15: | Line 15: | ||
== First Mission: The Frozen Wizard == | == First Mission: The Frozen Wizard == | ||
| − | Follow the way to find the frozen wizard | + | Follow the way to find the frozen wizard statue. |
| − | [[file: | + | [[file:GS Quest Map 1.png|200px]] [[file:GS Quest Map 2.png|200px]] [[file:GS Quest Map 3.png|200px]] |
| − | + | [[file:GS Quest Map 4.png|200px]] [[file:GS Quest Map 5.png|200px]] [[file:GS Quest Map 6.png|200px]] | |
| − | |||
| − | |||
| − | |||
| − | |||
| − | + | When you reach it, click on the statue until it pops the message: <b><i>The ancient frozen power has been destroyed, a gate seems to have been opened somewhere.</i></b><br> | |
| + | Once the statue vanishes, it will breaks the first gate to the next part of the quest. | ||
| + | Beware: every click on it will spawn a horde of monsters! | ||
| − | + | [[file:GS Quest Frozen Wizard.gif]] | |
| − | |||
| + | Go back to the entrance and follow the way to the first gate location. | ||
| − | + | [[file:GS Quest Map 7.png|200px]] [[file:GS Quest Map 8.png|200px]] | |
| − | |||
| − | [[ | + | == Second Mission: The Stalagmites == |
| + | On this part, you must find and slain 6 ice stalagmites.<br> | ||
| + | They are strong against all elements except fire and physical, so mages should consider using <b>[[Media:Exori_rexo_visterafrigomortflam.gif|exori rexo flam]]</b> against them. | ||
| − | [[file: | + | There is no specific order to kill them, I'll just show the fastest order below.<br> |
| + | They're tagged with red markers [[file:Marker (Red).gif]] | ||
| + | Follow the way to find the first and second stalagmites: | ||
| − | + | [[file:GS Quest Map 9.png|200px]] [[file:GS Quest Map 10.png|200px]] [[file:GS Quest Map 11.png|200px]] | |
| − | [[file: | + | [[file:GS Quest Map 12.png|200px]] [[file:GS Quest Map 13.png|200px]] |
| − | |||
| − | |||
| − | |||
| − | + | Go back to the entrance and follow this way to find the third stalagmite: | |
| − | [[file: | + | [[file:GS Quest Map 14.png|200px]] [[file:GS Quest Map 15.png|200px]] |
| − | |||
| − | |||
| − | + | Once you slain the third, go one floor up to the fourth stalagmite on this route: | |
| + | |||
| + | [[file:GS Quest Map 16.png|200px]] [[file:GS Quest Map 17.png|200px]] [[file:GS Quest Map 18.png|200px]] | ||
| + | |||
| + | |||
| + | Now, go down the stairs on the north to find the fifth and sixth stalagmite: | ||
| + | |||
| + | [[file:GS Quest Map 19.png|200px]] | ||
| + | |||
| + | |||
| + | Go all the way back and pull the lever [[file:Lever 2.gif]] located at the center of the main area with the star marker [[file:Marker (Star).gif]] | ||
| + | |||
| + | [[file:GS Quest Map 20.png|200px]] [[file:GS Quest Map 21.png|200px]] | ||
| + | |||
| + | |||
| + | == Third Mission: The Crystals == | ||
| + | On this part, you must gather 6 flawless ice crystals [[file:Flawless Ice Crystal.gif]] on blue chests [[file:Treasure Chest (Blue).gif]] around the area. | ||
| + | |||
| + | The crystals are located on the red markers [[file:Marker (Red).gif]] | ||
| + | |||
| + | Once you get it, place them on the green basins [[file:Coal Basin.gif]] located on the star marker [[file:Marker (Star).gif]] | ||
| + | |||
| + | [[file:GS Quest Map 22.png|200px|300px]] | ||
| + | |||
| + | [[file:GS Basins.gif]] | ||
| + | |||
| − | + | Enter the teleporter [[file:Magic Forcefield (Azul).gif]] and go west to find the boss room. | |
| − | [[file: | + | [[file:GS Quest Map 23.png|200px]] |
| − | |||
| − | |||
| − | |||
| − | |||
| − | + | == Final Mission: The Boss Fight == | |
| + | This fight has no special mechanics. | ||
| − | + | Head north and stay stacked with the boss that has tons of health points. | |
| − | |||
| − | + | [[file:GS Boss.gif]] | |
| + | Once you slain the boss, a teleporter [[file:Magic Forcefield (Azul).gif]] to the reward room will be created on the center of the boss room. | ||
<hr> | <hr> | ||
| − | [[ | + | [[File:Treasure Chest (Big).gif]] |
Latest revision as of 01:36, 24 March 2025
Requirements
- Access to Winterhold continent
- Level 1200
Rewards
- 135x Jewels
- Random Glaciersteel Set piece
- Access to Mid Winterhold Continent
Walkthrough
Enter on Glaciersteel Quest teleport

First Mission: The Frozen Wizard
Follow the way to find the frozen wizard statue.


When you reach it, click on the statue until it pops the message: The ancient frozen power has been destroyed, a gate seems to have been opened somewhere.
Once the statue vanishes, it will breaks the first gate to the next part of the quest.
Beware: every click on it will spawn a horde of monsters!

Go back to the entrance and follow the way to the first gate location.


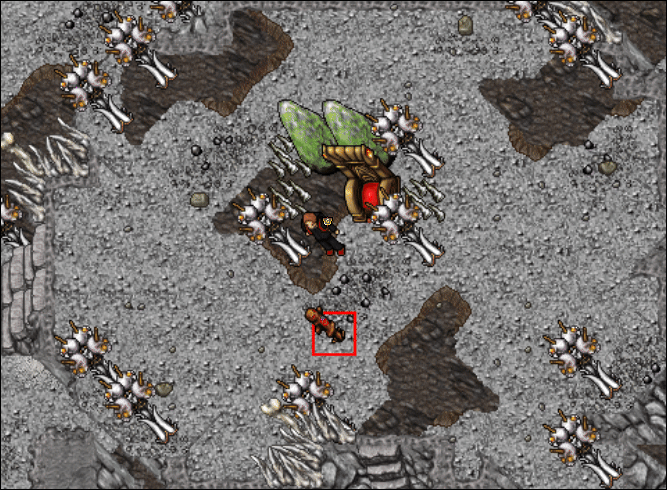
Second Mission: The Stalagmites
On this part, you must find and slain 6 ice stalagmites.
They are strong against all elements except fire and physical, so mages should consider using exori rexo flam against them.
There is no specific order to kill them, I'll just show the fastest order below.
They're tagged with red markers ![]()
Follow the way to find the first and second stalagmites:


Go back to the entrance and follow this way to find the third stalagmite:


Once you slain the third, go one floor up to the fourth stalagmite on this route:


Now, go down the stairs on the north to find the fifth and sixth stalagmite:

Go all the way back and pull the lever ![]() located at the center of the main area with the star marker
located at the center of the main area with the star marker ![]()


Third Mission: The Crystals
On this part, you must gather 6 flawless ice crystals ![]() on blue chests
on blue chests .gif) around the area.
around the area.
The crystals are located on the red markers ![]()
Once you get it, place them on the green basins ![]() located on the star marker
located on the star marker ![]()


Enter the teleporter ![]() and go west to find the boss room.
and go west to find the boss room.

Final Mission: The Boss Fight
This fight has no special mechanics.
Head north and stay stacked with the boss that has tons of health points.

Once you slain the boss, a teleporter ![]() to the reward room will be created on the center of the boss room.
to the reward room will be created on the center of the boss room.
.gif)